Wednesday 27 September 2017

Signal Box Part Two


After completing my small New South Wales signal box in my last post, I found myself staring long and hard at the photos I had taken of Neath Signal Box in the Hunter Valley. While it captured the essence of the hardy little survivor from the steam age, I soon realised that I was only going to get one chance to make this look like a replica of the original before gluing it into place on my layout. And that meant taking a scalpel to the so-far finished model to give the building some cosmetic surgery.

The long vacant concrete slab still needed some modification to fit the signal box's shape.

With the assembly and painting of the Walker Models kit already finished in my Signal Box Part One post, I started by testing that the structure was going to fit on the concrete slab I had built into position two years earlier when first constructing my layout. It turned out it didn't. Fortunately the building fitted perfectly between the lengthwise gap I'd left between the fencing. The foundations however were about 9 mm too narrow for the width of the building, which called for me to scrape away some of the scenery base and cut, paint and glue a fifth strip of balsa foundation in the area shown above.

Leftover flextrack ties or sleepers and some 1.5 mm round polystyrene make for easy line-side fencing.

Next up was the white metal post and rail fence shown in the photo. For this I cheated a little and used some 1.5 mm round styrene strip shoved through the holes of some plastic PECO sleepers or ties that were trimmed from a scrap piece of flextrack. I then pre-drilled the holes where the fence would sit alongside the track, and cut the sleepers to the desired height.

I glued the fence into position as I constructed it.

With the extra strip of balsa wood foundation now secured in place, I then glued the sleeper posts with the styrene rod in place into the pre-drilled holes and fixed a second railing to the top using some super glue. I came back to paint the posts white later.

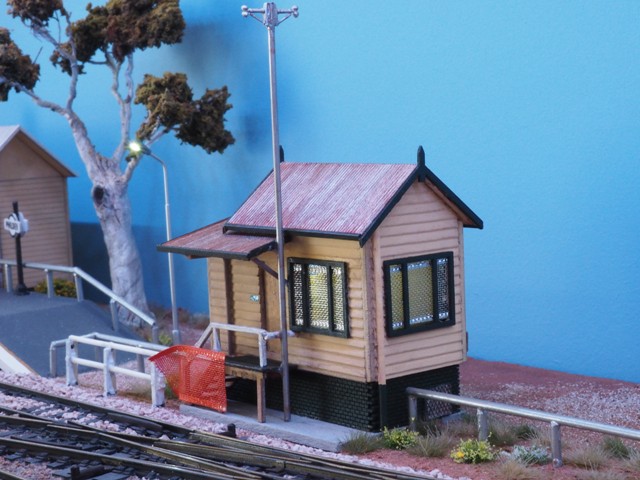
Some orange paint applied to my silver mesh ribbon turns it into some modern orange safety barrier mesh.

Next I turned my attention to the orange safety barrier mesh that had been tacked onto the bottom of the stairs in the photo. Using the same silver ribbon as I did for the security screen mesh on the windows, I painted this with some old Humbrol Enamel No. 18 Orange and set is aside to dry while I turned my attention to the awning supports. There is a strip of piping conduit on the corner of the building that runs all the way from the roof awning to the ground. I cut this using the same 1.5 mm round styrene strip and glued it to the painted using some balsa cement before painting it in the same Senco Off White Acrylic that I used for the weatherboards. I then matched the bottom of the styrene strip to the photo by painting in in the matching Tamiya XF-11 J.N. Green that I used for the brickwork.

Finally I cut the cross beam supports away from the side roof fascia, and also the platform awning support post from the corner of the handrail. Turning to my box of scrap parts leftover from my Faller Cement Works kit, I found a leftover section of 1 mm diameter drain pipe complete with a 45 degree angle bend, and used this as the awning down pipe that is awkwardly positioned between the signal box and the stairwell. I then used a leftover off-cut from this to glue the angled awning support beam that can be seen beside the door on the original. I then drew the latchbolt onto the balsa door with a black pen, and added the blue rectangular security company sticker to the left of the door.

The end result viewed in daylight, and once more out of place against the Caloundra skyline, 

My photos also showed an interesting radio antennae that was anchored to the platform base and platform awning. In the photo it is quite tall, and I guessed it to be around 4.5 metres tall. So I cut another length of 1.5 mm round styrene strip to a height I thought looked right, and then glued two angle brackets from my leftover kit scrap-box either side of it before painting it with my silver paint pen. Finally I could then add all these signature pieces to my finished model, and weather it accordingly.

I next added the LED light and glued the structure to the layout.

To add the tiny LED light inside the signal box, I taped the wire to a 1.5 mm x 40 mm high strip of styrene rod and shoved it up from underneath the layout into the pre-drilled holes in both the concrete slab and the base of the Walker Models building before gluing the signal box in place on my layout. The styrene riser holds the LED just above the height of the window frame so that it is not visible through the security mesh windows. If ever I need to replace the LED, it can be pulled back out from underneath.

The completed signal box now stands guard by the entry to Philden Station.

On the rear of the signal box I added a resin cast silver power metre box. The resin casting was a seconds sample given to me by Stuart from Walker Models to play around with, and I just gave it my silver paint pen treatment followed by a little dab of Rustall. I don't know if there was one on the back of the signal box as it was the one side I forgot to photograph when I visited the Hunter Valley in 2016. But for the sake of adding a little interest, I think it looks pretty neat.

Its a little bit ramshackle, but still structurally strong. Just what I was aiming for.

I measured the length of the orange safety barrier mesh before I trimmed it to ensure it just tucks messily in behind the white track-side safety fence. I've set my model in the era between 2002-2005, and the photographs I took of the building a decade later in 2016 show the building in a little worse condition and the safety barrier near trampled to death. So for arguments sake, we'll just say that this captures the beginnings of trespassers pushing their way through the safety barrier.

The end result was a pleasing enough match to Neath Signal Box. That's me on a visit in May 2016.

Since purchasing this kit two years ago, Walker Models have since released a newer version of the Neath Signal Box kit that is more accurate when it comes to the window sizes, roof awnings and supports and the shape of the platform as you can see on the real life version above. The original version I have just shown you how to build is now sold as the small NSWGR Signal Box. For myself, I'm glad I stuck with building the original kit, as it still enables me to keep the bus set down area on my layout that sits between the backdrop and the end of the railway station platform. Making the few cosmetic changes has enabled me to at least capture the essence of that day back in May 2016 when I visited what remained of Neath Railway Station, didn't see any trains, but at least had a great dinner at the nearby Neath Hotel.

See also; Signal Box part One

Tuesday 19 September 2017

Signal Box Part One


I've purposefully held-off from building this NSW Signal Box kit despite having told everyone my bookshelf layout was finished. Regular readers of my blog would have noticed the vacant concrete slab in front of all the photos I've posted of busses pulling up beside Philden Station, and probably wondered why it was there.

The concrete slab for the signal box has stood vacant for almost 2 years.

Back when I was still constructing my layout, I purchased one of Walker Model's NSW small signal box kits, (the one based on Neath in the Hunter Valley), built the concrete slab to the dimensions of the model's base, and set it aside. All with good reason. Being a small layout I knew that one day the inevitable would occur, and I'd find myself sitting back, looking at the layout and ultimately becoming a little dissatisfied that it was now all finished. Well, that day did arrive, and rather than feeling disheartened that I still didn't have the room to expand, (or worse still tearing everything up and starting over), I took out the little signal box kit that I had set aside, and took my time enjoying working on something new.

The Walker Models NSW small signal box is a simple but rewarding laser-cut kit building.

The kit's inner shell glues together easily, and the outer laser-cut timber shell simply glues over the top.

In next to no time the building begins to take shape, although the stairs are a fiddly little item all on their own.

I next test-fit the stairs to ensure that everything aligned.

The instructions in the kit drew my attention to the roof pitch where the walls needed to be filed to the same angle as the roof-line. I simply used a sharp hobby knife to angle the top of the walls and also the roof pieces so they fitted perfectly.

After completing the basic shell of the building, it was time to consult my own photos to decide how I would finish the little signal box. Those who read my final Railway Reminiscing post on Neath over on my author blog, will appreciate that I wanted to try and capture the essence of what Neath Signal Box looks like today. I wanted a structure that would complement Philden Railway Station, rather than trying to model the signal box exactly. So the photo below served purely as a guide.

Neath Signal Box in the NSW Hunter Valley, as I photographed it on a visit in May 2016.

Look closely beyond the rundown appearance of the small stairway, and the first thing you notice is the metal security screens bolted over the windows. They have obviously done their job when it comes to stopping rocks being thrown through the glass windows. Also, the signal box door looks as though it had been replaced at some point. As it was nothing like the door that came supplied with the kit, I simply made a plain door using some 2 mm balsa wood. With my layout set between 2002 and 2005, I wanted to include these modern touches on a still existing remnant from the steam era.

I used some silver mesh ribbon glued to the inside of each window frame to get the desired look.

The ribbon was the same one that I used to construct the chain mesh fence along the cement plant siding, (see a between shows refresh for a recap). I cut and then glued each piece to the inside of the window frame for a neater appearance. The chain ribbon is see through and provided such a good effect, that I didn't bother fitting the clear window panes on the building.

I then put the finished security screen clad windows aside to paint the signal box and roof.

I next painted the building in matching colours to my photographs, of which the weatherboard colour also happened to be the matching shade of cream on my existing A-4 station. I used Tamiya XF-11 J.N. Green for the bottom brickwork and fascia boards, and a well watered down Senco Acrylic Off White for the signal box weatherboarding. The roof received a quick-and-easy treatment from my trusty silver paint pen, and when dry, it glued into position with a generous smear of craft glue.

The finished result looks pretty neat in broad daylight, and captures a lot of the feel from the prototype.

The silver bracket and square panel at the base were just leftover bits from my junk box.

I took the painted model outside to photograph it in broad daylight, although it does look a little out of place pressed against Caloundra's skyline instead of a small Hunter Valley town. More importantly, building the little signal box has breathed some fresh life back into my small layout.

Although I added some clutter to the building courtesy of some leftover bits from my junk box, the model is still far from finished. Next up I will add an LED light before installing the signal box beside Philden Station. To replicate the photo a little better, there is also some bright orange plastic safety barrier mesh and a white post and wire fence alongside the track to be added. While in the odd-shaped corner alcove of the building there is a twiggy frame of a dead bush clinging to the side of the signal box. They're both small details that will give the model a big dose of atmosphere. But as usual, I'll let that be a story for another day.

See also; Railway Station Part Six

Saturday 12 August 2017

Exhibition #2 Pine Rivers


It's been a week since I exhibited Philden for the second time at this year's 2017 Pine Rivers Model Train Show in the northern Brisbane suburb of Strathpine. I'm glad to say the layout is now back safe in our apartment by the sea in Caloundra, and once more standing proudly above my desk as I write this. But first of all, I wanted to share with you the biggest challenge I face each time I decide to pack Philden in the car and take it on the road; getting it down the stairs!

There's 6 flights of stairs between the door of our apartment and the garage.

While I enjoy great ocean views from our top level apartment overlooking the sea, getting the layout out the door and down six flights of stairs to pack it safely in the car remains my biggest hurdle. At each and every turn on the four landings between the door of our apartment and the garage, there is just enough room for one person to stand holding the end of the 1.9 metre long main layout section while the other person has to stand sideways and twist while passing it up and over each handrail. While the layout is not very heavy, it is an awkward process to say the least! Once the layout is packed safely in the car however, it takes less than 45 minutes to unpack, setup and have the first train running when we arrive at the other end.

I use old grocery plastic bags to wrap my buildings in and transport to shows in a separate box.

The other thing I always do when taking Philden on the road, is carefully pack both the station building and the railway goods shed, which are both removable, into a sturdy box like I've shown above. Unfortunately, I left this box at home on my desk shortly after taking this picture, and didn't realise until I had the layout set up at the venue. Thankfully I travelled to and from the Sunshine Coast to Brisbane each day for this show and could simply bring it with me the next morning! (Reminder to self; don't dare do this should we take the layout to Sydney!)

Has this blog gained me a reputation in being located beside the fire extinguisher? Don't know what I mean? then click here.

For this show, our country music playlist on the highway was a mish-mash of everything modern, but fittingly as we passed by the Caboolture exit we had Keith Urban blaring in the car. The venue for the Railway Modellers Club of Queensland show at Strahpine was a good one. The Strathpine Community Centre was spacious, modern, had good lighting and facilities and most importantly had a level floor.

There was only one moment of panic for the entire weekend, and that occurred shortly after I'd set-up and test ran a locomotive on the layout. One of my staging shelf sidings was dead, and it took me 20 minutes to trace the problem back to a broken wire connection beneath the layout on one of the isolating toggle switches. It must have broke loose at some point between packing and unloading the car. Thankfully I always carry a fix-it box full of things like pliers, screwdrivers and a soldering iron for if things go wrong. In this instance I was able to use some wire glue to re-do the join to the toggle switch and I was back and running.

The RMCQ members were friendly to the point of ushering both Denise and myself out the back of the venue for an impromptu sausage sizzle the moment we arrived on a Friday evening to set up, something which was much appreciated given how rushed we both were in finishing work, packing the car and travelling down from the Sunshine Coast in dreaded Friday afternoon traffic. The hospitality then continued all weekend long with constant reminders to help ourselves to free tea, coffee and biscuits in the exhibitors canteen. Saturday evening saw my wife Denise head off for dinner with our daughter who lives in Brisbane, while I stayed behind for a bbq and a chin-wag with the boys. I must also thank fellow blogger Craig Mackie for the impromptu tour of the nearby RMCQ club rooms in Brendale. The facilities and sheer size of the club layouts was more than just impressive, and makes a strong statement about just how healthy our hobby is here in Queensland, Australia.

I deliberately included this photo as a reminder to myself of what havoc the venue lighting poses for photography.

I got so caught up talking to people throughout the weekend at this show, that I totally forgot to take the camera out and capture some photos of other people's layouts. Instead of coming back with a swag of photos, I came back with a short list of names and numbers of fellow modellers who I'd really like to meet up with later, including a fellow modeller I discovered also lives in Caloundra. I think my calendar is going to look busy for the remainder of the year.

The above photo I've included to show the difficulties in photographing a layout with a perspex panel. While the layout was easily viewed from every angle with the naked eye, taking out the camera and photographing the reflection of the hall's ceiling lights is proving a bit of a drawback. Despite the plastic chain barrier keeping most hands at arm's length, the perspex has saved my models at least a dozen times from over-keen youngsters trying to poke at the scenery. Given that my bookshelf layout is so narrow and built to the edge, I still think that for now I'm just happy to demonstrate the feature of having a removable perspex panel to the keen photographer, and keep it there when the show is busy with a large number of families. After all, it is getting by far more positive comments from the visiting public about what a good idea the perspex is to stop the layout from getting damaged, than it is remarks about it being difficult to photograph on their smart phones.

Yes, that is the latest Model Railroad Planning book on my desk for my next plans...

So returning home on the Sunday evening, with Keith Urban once more filling the silence from two days of me being talked-out, we left the layout in the car until Monday morning when once more we hiked it back up six flights of stairs, and re-assembled it above my desk. I had a list from the Brisbane Model Train Show back in May of things I wanted to improve ahead of Philden's next outing, but sad to say I only got around to one of them for the Pine Rivers Show, and that was replacing all the lighting in the buildings with LED's. So after two days of once more having the layout incorrectly identified on account of all the railway memorabilia that is mounted on the framework (you can take your pick with Granville, Point Clare or Broadmeadow), I'm glad to say I have ordered a custom-made LED sign with the name PHILDEN spelled out in Countrylink colours. They assure me I will easily have it in time for the layout's next outing at the Gold Coast Show in October. So there will be no mistaking Philden the next time it is exhibited, and maybe, just maybe, I might exhibit it without the perspex panel in place to gauge the difference in interest levels.

In the week that followed the Pine Rivers Model Train Show, the trains have sat quietly above my desk as I've been inundated with work on all fronts. Including an interview with ABC Radio Southern Queensland about my latest book Last Train to Brisbane, and strangely enough having one of my earlier novels Last Wish of Summer featured on this year's Bookworks Summer Reading List in the States. I don't know why after almost 5 years, but fortunately I made the novel available as an independently-released eBook in the weeks that followed being dumped by my previous publisher, so any sales at this point are most welcome for Philden's future layout fund!

Speaking of which, that's the finished and rolled-up plans for my next layout project in the above photo. After waving the white flag at any upper-level extensions on Philden, I've decided to leave any extension plans for when I have a dedicated train room in which to turn Philden into a much larger L shaped layout. These plans are instead for what is going to go beneath Philden. Yes, it will replace my current desk. Yes it will be a change of scales, and if my Star-Wars-esque quote on Philden that says "somewhere in New South Wales, at a railway station far, far, away..." is anything to go by, then it will entail a trip to the dark side. For as I discovered from a weekend a chatting with modellers of other scales and interests, the saying is true. "Come to the dark side. We have cookies." But as usual, I'll let that be a story for another day.

See also; Exhibition #1 Brisbane Beginnings