Building a Station Platform

Railway platforms are one of those things that differ greatly, depending on which part of the world, or indeed what part of the country you are trying to depict in model form. Railway station platforms in Australia, the United Kingdom and throughout Europe are normally raised level with the floor of the train carriage, as opposed to the North American practice of having passengers climbing steps to board trains from ground level. So whatever you are modelling, it is important to get it right.
Before getting to work on building the railway station for my layout, I measured the footprint for what would be a raised stonework platform based on the length and floor height of my Countrylink Xplorer train that will soon be pulling up alongside it. With the outline of the station building already measured out in my previous post, I then cut the sections that would form the stonework beneath the station. I used 5 mm balsa wood as it is thick enough to have the stonework carved directly onto it.
 |
| I hand carved the stonework into the side of the platform faces using a hobby knife. |
Modern Australian railway platforms tend to be raised steel frame and cast-concrete these days, but in the past, platform sides were built with anything from timber, brick or stone. I chose to model a platform built using quarried stone blocks, purely because I didn't feel I could replicate intricately scaled brickwork using this method. But for modelling a historic railway station approaching 100 years of age, I thought stone platform sides would give it a sense of heritage. I drew lines 4 mm apart using a ruler, and simply got to work carving V-shaped lines using an overlapping brick-pattern that stonemasons would have used.
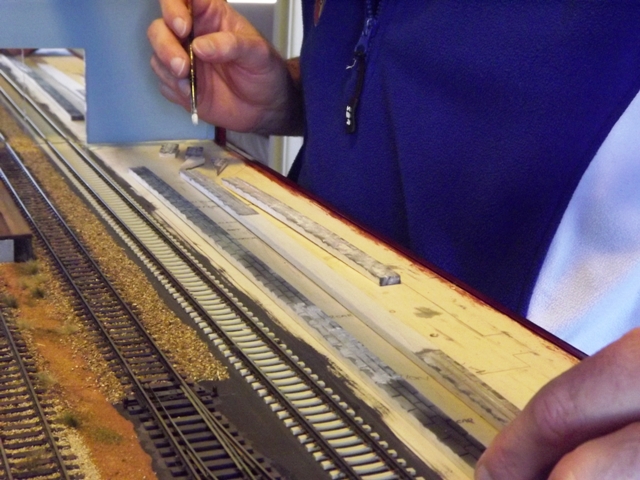 |
| Next I painted what would be the mortar lines for the stonework. |
After ensuring that all the outwardly facing sides were carved and that the alignment of the stonework pattern lined up, I then painted what would be the mortar lines for the stonework with a hodge-podge mixture of light grey. I painted the platform side facing the rails a darker shade than the non-rail side to simulate years of passing trains dating back to the steam era.
 |
| I painted the surface of each block in darker shades of brown and grey to make the lighter mortar lines stand out. |
Next I played around mixing shades of brown and grey on my artists easel, and carefully hand painted each individual block in different shades. The secret is to not start at one end and work to the other. Instead, work your way along the section by randomly painting every fifth block, change shades of paint and do the same until no two blocks beside each other appear the same colour. I found that each block needed at least 2 coats of paint, and going over the same block with a different shade somehow gave the finished model a more uniform look.
 |
| The finished stonework sections of my platform, ready to be assembled. |
After the paint had dried, the first thing I noticed was that the long sections of balsa wood had warped and buckled from having one side painted so heavily. So I cut some 13 mm strips of balsa to use as extra bracing before assembling the platform.
 |
| The platform sides assembled and ready for the surface to be added. |
Once glued, I could then turn my attention to the platform surface. Using 3 mm balsa wood, I measured and cut a single 600 mm long x 55 mm wide piece for the platform, and a 55 mm x 55 mm section for the platform ramp. The rear section is to be occupied by the station building. To make painting what will be the front white strip of concrete along the platform edge easier, I cut a separate 5 mm strip of balsa wood. This is the final chance you will have to check the clearances between your trains and the platform edge, so make sure you get it right by testing all your locomotives and rollingstock. What looked fine for my sleek Xplorer train, was actually too close for my 82 class locomotive. Australian platforms have a slight overhang above the platform sides anyway, which makes it easier to adjust for the train clearance.
 |
| The asphalt surface painted and glued firmly into position using anything I could find to weigh it down while drying. |
 |
| The finished platform, and as usual I am already jumping ahead to my next project; ballasting the track. |
I painted the separate white platform edging with Tamiya X-2 white acrylic paint. For extra effect, I added a painted yellow safety line by running a thin stripe of Humbrol matt yellow enamel along the edge of the grey asphalt platform surface using a flat No 1 artists brush before gluing the now dry platform edge strip into place. Though the station platform is now complete, there is still a lot of work ahead of me to complete the railway station as a whole. At least now I can finish ballasting the track in front of the platform. But as usual, that's a story for another day.
See also; Railway Station Part One


Comments
Post a Comment
Thanks for taking the time to visit Philden. I hope you'll book a return ticket soon. Cheers, Phil