Detailing a Highway Overpass

Scenery is perhaps my favourite aspect of building a model railway, apart from watching my trains run through it that is. So after completing the highway overpass that disguises the mouse-hole that will lead to my hidden staging are, I just couldn't wait to build the scenery around it.
 |
| Acrylic gap sealant mixed with brown and black paint makes an ideal rock base colour that is unbreakable. |
In my previous post, I walked through the process of building scenery terrain from the polystyrene packing foam that came with our new washing machine. Now I have to coat it in my special formula that will form the surface of my rocks. Remembering that anything non-water-based will simply dissolve the foam before your eyes, I use a mixture of 60% acrylic gap sealant and 40% water based grey and brown acrylic artists paint with just a splash of water thrown in to increase the amount of time that the mixture is pliable.
 |
| Applied liberally, the gap sealant 'goop' acts as a paint and sealer all in one. |
I then proceed to paint the exposed foam in a liberal layer of the 'goop' using an old flat-tipped paint brush. The thick gap sealant acts as a white paint base that can be mixed with some black and burnt umber artists acrylic paints to create whatever shade of natural rock colour you are after. Just avoid using anything that has a gloss or sheen to it. You want this to be as dull as possible.
 |
| The finished result will not chip or crack and can withstand being poked, and is now ready to be scenicked. |
When dry, the base coat of tinted gap sealant will be strong enough to press your thumb against without leaving an impression or cracking. The finish is so much more durable than plaster of Paris. I can now get to work on detailing the rock surface using various coats of different shades of grey.
 |
| I added more than 50 shades of grey to achieve the look of weathered granite. |
Using the same method I outlined when hand painting my track, I created a hodge-podge selection of rock colours on my artists palette, and then got to work highlighting the depth of the rocks contour. In trying to achieve a weathered granite look, I started by applying darker shades to the cracks and recesses on my modeled rock face, and lighter shades on the more weather exposed sections. Finally, I dry brushed the imperfections and raised ripples created from the gap sealant base with a shade of grey that was even lighter still, by simply wiping the paint from the brush until the bristles almost appeared clean, and brushing it lightly over the modeled rock's surface until I had achieved my desired effect.
 |
| Then using PVA water-based wood glue, added scenery around my non-exposed rock surface. |
Next up, I got to work on adding the scenery base. There was nothing fancy here, just the same watered down PVA wood glue, Chucks Ballast Karuah No 2 crusher dust, and Woodlands Scenics T44 burnt grass flock I had used in my previous post adding some ground cover.
 |
| A hairdryer can speed up the drying process, but I discovered the hard way that too much will cook your scenery. |
It was about this time when I got a little too excited, and tried to speed up the process along by pulling out my wife's hairdryer to hurry the drying process along a little. It worked fine on my modeled rock surface, but after a few minutes of hot air blowing on the section of track I ballasted beneath the overpass, some sections beside the track started rising up like a cake in the oven. Fortunately I stopped in time to pop each bubble with a sharp hobby knife and reapply a tiny amount of ballast to the affected area with a few extra drops of my glue solution to settle it back into place. Crisis averted!
 |
| When dry, the rock area is ready for the finer scenery details such as grass tufts and trees. |
Going to my modelling box of tricks, I took out some ready made gum trees by Trackside Trees I had purchased at a model train show, and the same Leadbear's Tufts I used around my goods shed platform that I had bought on eBay.
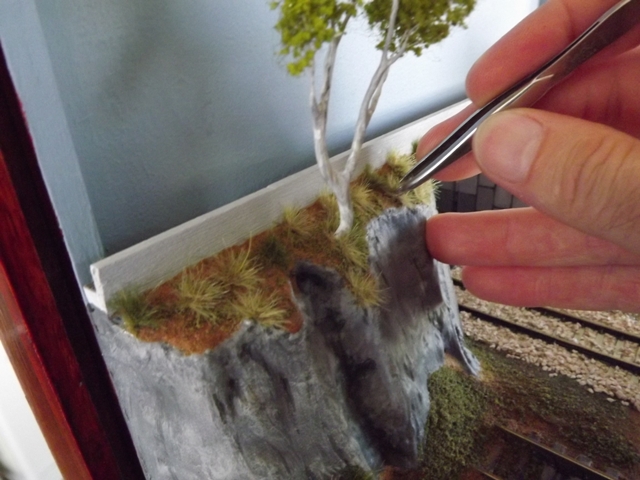 |
| I now love using Leadbear's Tufts for my model railway landscaping. |
Having learned the hard way how best to apply them in my previous post adding some ground cover, I had no trouble transforming the area around my highway overpass. To add the trees, I simply drilled a hole large enough to accommodate the trunk into the now modeled rock surface, and filled it with PVA wood glue so as not to damage the polystyrene foam. The trees dried upright into place overnight.
 |
| And finished off with some signature Australian gum trees, my highway overpass looks complete. |
I went nuts applying the scenic grass tufts, and must have individually placed around 140-160 of the Leadbear's Tufts on this one scene alone. The trees I decided to keep simple, there are just 3 medium sized gums growing alongside the highway overpass to represent the sparse semi-outback of New South Wales. Its meant to convey the feeling of a whole lot of nothing with a few trees thrown in for good measure.
 |
| The entire highway overpass scene only takes up 6 cm of space on my layout. |
So there you have it. After building my highway overpass using mirrors, the scenery around my shallow relief highway backdrop is now complete. As my trains run beneath the highway and disappear down the line to somewhere else in New South Wales, hopefully people will stop and look at the detail that has gone in to disguising the fact that when the mouse-hole door that leads to staging is closed, they are just looking at their own reflection. And if I've done it right, perhaps they won't notice the mirror at all. But there's just one thing that I think is missing to reaffirm that it is an Australian highway overpass that crosses above the track, and that is a road sign. So next up I will add a Kangaroos Next 10 km sign beside the concrete safety barrier. I don't think anything says Aussie more than that!
See also; Building a Highway Sign and Building bridges using mirrors


Comments
Post a Comment
Thanks for taking the time to visit Philden. I hope you'll book a return ticket soon. Cheers, Phil