Railway Station Part Three
After getting sidetracked with other modelling projects, namely running trains up and down my bookshelf layout, it seemed about time that I once more turned my focus to completing the station building at Philden Railway Station.
 |
| With the inner-shell of the building already complete, I got to work painting the weatherboard cladding. |
The NSWGR A-4 weatherboard station is a Model Train Buildings laser-cut wood kit that is typical of many intermediate country train stations across New South Wales. While there were many different variations to what was a standard government design station building, the Model Train Buildings' version comes with an open passenger waiting room. With the inner-shell of the kit and foundation for the building already constructed, I painted the weatherboard cladding separately before applying the outer skin to the structure. I used an off white acrylic artists paint made by Semco that is available through Spotlight, and watered the paint down with about 30% water. I applied just 4 coats of the thinned down paint with a flat artists paint brush, which was enough to achieve a uniform finish without losing any of the detail.
 |
| I made the stone base for the station building from balsa wood, and stained each block a different colour. |
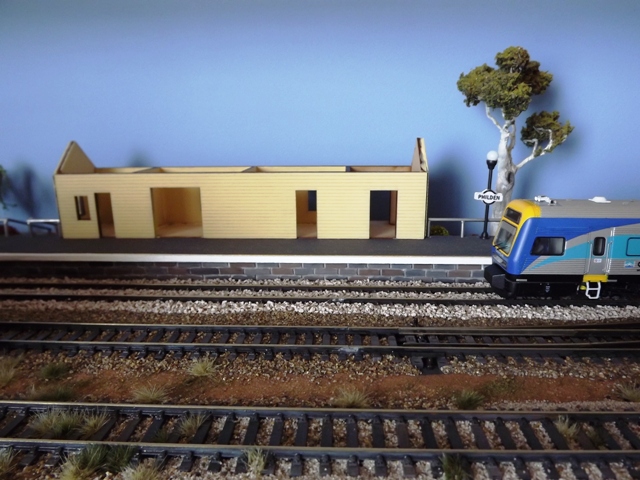
Having already walked readers through how I built the station platform in a previous post, I now had to make a tiny modification to the kit to enable the weatherboard cladding to sit flush with the platform. I wanted the floor of the waiting room to sit almost level with the platform surface, so the foundation for the building is slightly recessed as shown in the photo above. The thin laser-etched birch that forms the outer skin of the building was easy enough to trim a 3.5 mm strip in line with the base of the doorways on the platform side with a sharp hobby knife. I also had to trim a 3.5 mm cut to accommodate the corner of the structure sitting between the steel handrails visible in the above photo. But that is the beauty of working with a laser-cut timber kit, they are easily modified to achieve their own unique finish.
 |
| I then tacky-glued the painted weatherboard cladding to the inner-core of the building. |
With the paint dry, it was time to bring out the tacky glue. I've come to love working with this stuff. It dries fast, clear and is easy to clean up any glue that seeps out when you press the outer skin to the inner-core of the model with a damp Chux cloth.
 |
| The modified corner of the kit enables the building to sit flush with the platform height. |
You can see how the cut away corner of the building enables the model to sit flush with the height of the platform, while in the background the CountryLink Xplorer stands ready to depart Philden. While I still have the roof, windows and interior to detail, the above photo complete with gardens, scratch-built handrails and station sign gives a tiny glimpse of a finished scene. But to give readers a taste of what I'm trying to capture with my layout, I guess you have to compare my progress so far to that of the real thing. So I present the following two photos...
 |
| That's me soaking up the sunshine at the restored Lowanna Station on the former Dorrigo Branchline... |
 |
| ...and that's my Xplorer service arriving at Philden Station. I think the colour is a good match. |
Readers will know that I am a writer. So if a picture tells a thousand words, then I hope that my station scene, (when it is finished), provides me with ample inspiration to write a railway based mystery novel. Conspiracy, murder and mayhem. Sounds like the 9.10 to Philden.
See also; Railway Station Part Four or Railway Station Part Two and Railway Station Part One and Building a Station Platform


Comments
Post a Comment
Thanks for taking the time to visit Philden. I hope you'll book a return ticket soon. Cheers, Phil