Sacrificing length for functionality
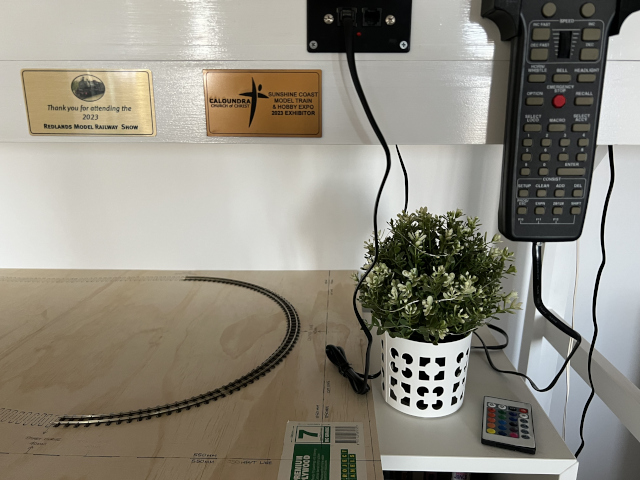
For a small and simple layout such as this, it wasn't really necessary to draw a track plan on paper before I started constructing the layout. All I needed to do was draw the track plan directly onto the sheet of 596 mm x 1200 mm x 7 mm plywood, and mark where I was going to cut the board down to size.
 |
| As you can see above, the board will now be cut down to a size of 550 mm x 1150 mm. |
After already writing about the reasons for my needing to keep this layout within the confines of 1st Radius curves, (see previous post here), I still had to decide how much of my twin IKEA Eket cabinets' length could be taken up by my small model railway. Although I had a total length of 1400 mm to play with, as it is going to sit beneath the staging shelf of my Philden Beach layout, there were a few key issues which led me to sacrifice the layout's length for some added functionality.
- I'd already promised my wife there would be room for a Grandbuby photo to go on display beside the layout.
- As you can see in the above photo, the throttle cable from the layout above it dangles down at around the 1150 mm mark, and I didn't want it getting in the way or damaging the corner scenery.
- Without leaving 250 mm of space clear, there would be nowhere to put anything down when operating either layouts without placing it directly across the staging tracks above it. Think of the 2nd DCC throttle whenever a friend calls around to run some trains, that cup of coffee or glass of wine your wife hands you when you've got the control throttle in your hand, or a set of operating cards.
- See point one again, because life's just so much better when you keep your spouse happy.
Once again, I marked a 40 mm buffer from the edge of the layout board to the outside sleepers of the track, and as promised, I traced around each sleeper profile so that you could see the track outline better in the photos.
As I'm using flextrack for the long straights at the front and back of the layout, I incorporated a slight wiggle over the 500 mm length before the line met with the next 1st Radius curve. It will provide some interesting modelling opportunities with things such as slate retaining walls and lineside fences, compared to simply leaving it as a straight line.
The compact layout leaves me with a final size of 550 mm x 1150 mm. It's the layout's width rather than length that is going to limit what I can do scenery wise, but it does leave me enough space to model a few village buildings to create my Christmas scene, which is the sole purpose of this layout build. I'll just work within the space I have available and be confident in the knowledge that the extra 250 mm of length I had just sacrificed wasn't going to make that much of a difference anyway.
 |
| The layout board will now get 50 mm trimmed from both the front and end closest to the decor plant. |
As you can see, this isn't a layout for those dreaming of a room size empire! Also, this Christmas layout definitely won't be ready in time for Christmas this year! However, if time does permit between now and the end of the year, I can get to building the framework for the layout board now that I have the dimensions locked in place.
If you like what you read, leave me a comment below. Or better still, click on the blue coffee cup to the right and buy me a coffee... https://www.buymeacoffee.com/phildenmodelrailway


Comments
Post a Comment
Thanks for taking the time to visit Philden. I hope you'll book a return ticket soon. Cheers, Phil